Thursday, February 28, 2019

February 2019 Paper Pumpkin alternatives, helpful tips and refill kits!


I was so excited to receive this month's Paper Pumpkin in the mail! Stampin' Up! designers gave us an amazing sneak peek at this month's kit. Here it is if you missed it. 


Click here to watch the video on my blog.


I made one of each card following the directions in the kit - or at least trying to. My creativity always gets the best of me and I can never follow the directions word for word. Can you blame me??? The Paper Pumpkin kits come with so many amazing products to play with! 


Here are some of my alternative cards. I really liked a lot of supplies in the kit, so a lot of these use the same products, just in a different way. 

This first card uses the patterned white card base and the vellum sheet. I cut the succulent background cardstock into three strips - 1 x 3 1/4" (2) and 1 x 3 3/4". I stamped the sentiment in Mint Macaron ink on the included white strip and added a bow with the black twine. 


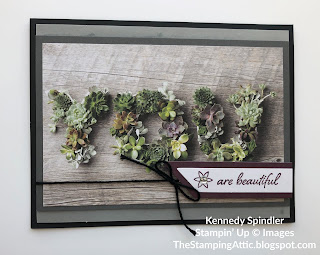
This next card is a slight variation using the black card base, vellum sheet, gray layer and "YOU" succulent image. I cut the white strip shorter and layered it with Fresh Fig. A black twine bow completes this card. 


I brought in the Wood Textures designer series paper for the background with a Mint Macaron card base. I fussy cut around the succulent image and added it to the card with dimensionals. 


I love using this technique, especially with designer series paper. I took the succulent cardstock, placed it in my paper trimmer on an angle and cut. I glued them to a Mint Macaron card base, leaving a space in between. I stamped the sentiment in Fresh Frig. 


I had so much fun making this card! I love this striped card base, but I didn't love it with the succulents. I punched out Lemon Lime Twist and Mint Macaron cardstock with the 2 1/4" circle punch. I also took one of the vellum sheets and punched out another circle. I layered the circles and added some of the included cardstock strips and embellishments. 


One of the great things about Paper Pumpkin is it's all-inclusive - you get everything you need. But there's always coordinating Stampin' Up! products you can buy to make even more projects! 

Glue Dots
$5.25


  • Paper snips scissors are perfect for trimming your ribbon, twine, and paper. 

    • It's always good to have multiple adhesives on hand. Liquid glue can pretty much be used on anything and gives you the freedom to move your paper around a little bit before it dries. 
    • Your Paper Pumpkin kit comes with glue dots, but why not have a whole roll! These are great for ribbon, twine, embellishments and so much more. 
    • Snail adhesive, like liquid glue, can pretty much be used on everything. But, it's mess-free! And super easy to use. 
    • The Simply Shammy is the easiest way to clean your stamps and keep them in good condition for many years to come  

    https://www.stampinup.com/ecweb/products/12402/past-kits


    Don't miss out on Paper Pumpkin refill kits! Available to all Paper Pumpkin customers, the refill kits come with everything in the original kit except for the stamp set and ink spot. Click the image above to view all past kits. 

    Click on the image below to purchase the Grown with Kindness refill kit. Limited quantity, so buy before they are gone! 


    Click on the products below for details and to go right to my Stampin' Up! Store: 

    Product List
    Glue Dots
    [103683]
    $5.25

    Saturday, February 23, 2019

    Dear Doily Bundle - Not your grandma's doilies!

    Copyright Stampin' Up!

    I am so excited to feature this beautiful bundle in this week's video! What's the first thing you think of when you hear the word doily? Do you think of the white lace circles topping every single table in your grandmother's house? Well, you won't think that after you see the beautiful cards you can make with this stamp set and thinlits.

    It was so easy to design with this bundle. The hardest part was deciding what stamps and thinlits to use on the cards - I wanted to use them all! Make sure to scroll down to the bottom to see a video showing you how to make all these cards. 

    These first cards I made feature the In Color Embossing Powders. As soon as I saw the large doily stamp, I just knew it would look heat emboss beautifully. I created three different colors - Grapefruit Grove, Call Me Clover and Lovely Lipstick - with the same general design.


    I think I like how the Grapefruit Grove embossed the best.


    Doesn't the embossing just look amazing?! I stamped some of the smaller doilies tone-on-tone on the card base before adding the rectangle stitched framelit on top with dimensionals. 


    Here it is in Lovely Lipstick. 


    I love when Stampin' Up! makes two-part sentiments like the one I used here. "Words can't express...how much your kindness touches my life." 


    Here's the last card in Call Me Clover. 


    Here's another two-part sentiment. "Words can't express...just how much you mean to me." 


    Dimensions: Card base 5 1/2 x 8 1/2 scored at 4 1/4, Whisper White Rectangle stitched framelit (2nd largest), 2" or 1 3/4" circle punch, coordinating color 2 3/4 x 1, Whisper White 4 x 5 1/4

    Ink colors: Grapefruit Grove, Lovely Lipstick, Call Me Clover 

    Additional Supplies: Heat gun, embossing powders, Big shot I really like how this next card turned out. It is completely different from my original sketch, but sometimes those are the best cards. I wanted it to have a distressed look so I used two different techniques - sponge daubing and faux suede technique. I talk more about these techniques in the video below. 


    Dimensions: Card base 4 1/4 x 11 scored at 5 1/2, Highland Heather 4 1/8 x 5 3/8, Very Vanilla 3 7/8 x 5 1/8, Highland Heather and Pear Pizzazz for thinlits 

    Ink Colors: Pear Pizzazz, Highland Heather, Gorgeous Grape, Early Espresso

    Additional Supplies: Sponge daubers, Big Shot, Bone folder, Silicone craft sheet


    Here's a video showing you how to make all these cards. 


    Click here to watch the video on my blog.


    Click on the products below for details and to go right to my Stampin' Up! Store: 

    Product List
    Big Shot
    [143263]
    $110.00
    Glue Dots
    [103683]
    $5.25
    Heat Tool
    [129053]
    $30.00


    Thank you so much for taking time out of your day to check out my blog! Orders are always appreciated. Make sure to subscribe below.


    Stay updated!
        o  Receive email updates about my blog – subscribe here 
        o  Follow me on Facebook to check out my local events!
        o  Tune in on Facebook every Saturday at 11 am (central time) for my Share It Saturday videos

        o  It’s SALE A BRATION time! Now until March 31, receive a free item for every $50 spent.       Click here for more information. 
        o  Check out this month’s Paper Pumpkin kit – subscribe today by clicking here
        o  Click on the images below to view the current catalogs